Welcome to a new series that I’m starting with a few colleagues at Pragmatic Works. The goal of this series is to document many design practices and solutions to problems that we often run into with customers. Each post will be accompanied by a video (found in the bottom under Resources) that walks you through the solution in depth. I hope you enjoy this new series!
One feature I am a huge fan of is adding fields to a visualization’s tooltip to help give end users more context to the data they are seeing. Tooltips (as shown below) automatically add fields that are using in the chart but you also have the option to add additional fields that aren’t used anywhere else in the chart.

Problem
While I do really like this feature there are also some problems you may run into when using it. Let’s examine the problem:

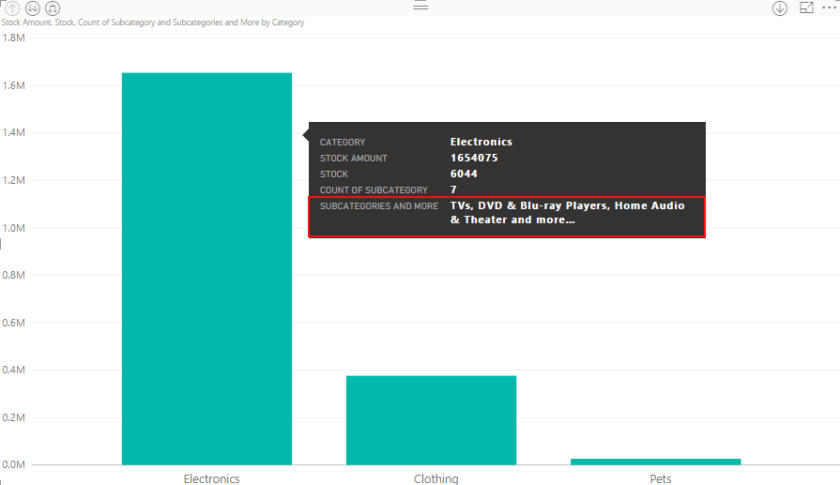
In this example I have added the fields Stock and Subcategory from the Fields list. Stock is a implicit measure, which means it is automatically aggregated, and Subcategory, which is a text field.
This works perfectly for Stock because it automatically summarizes the value but, you’ll notice above that the tooltip for Subcategory has an interesting behavior. Rather than displaying the list of the values in Subcategory it actually just show the very first value. This happens because the Tooltip field requires that any column used in it be able to aggregate or roll up the values into what’s shown on the chart. Since Subcategory is just a text field Power BI automatically applies the FIRST function to return back the first value that appears. You could optionally change this from FIRST to either LAST, COUNT, or COUNTDISTINCT.
So the real problem I want to solve here is rather than only showing the first subcategory how do I list all the subcategories in a comma separated list in the tooltip? Let’s walk through a couple possible designs to this solution.
Design
There are a couple different approaches to solving this problem. One way would be to just give every Subcategory in a comma separated list. The problem with that is what if you have 200 subcategories. With 200 subcategories your tooltip can become even larger than the chart itself. So let’s walk through to possible ways of solving this problem. The first method will be a simple design that does not account for the possibility of 200 subcategories. Then the second method will be a more elegant solution that accounts for a large number of subcategories.
Simple Design
With the simple design we’ve created a small calculated measure that simply concatenates all the values in the Subcategory column together with a comma separator.
Subcategories = CALCULATE(CONCATENATEX(VALUES(‘Stock'[Subcategory]),’Stock'[Subcategory],“, “))
Let’s break this down a little bit:
- The CONCATENATEX function is used here to roll up a list of values, in this case a list of subcategories, into a single single row with a comma separator.
- The VALUES function is used to return back a distinct list of subcategories. This way we don’t see duplicate values appearing in our comma separated list.
- Finally the CALCULATE function is used to set the proper row context here. This ensures the list of subcategories are associated with the correct values in the dataset.
This solution is nice but not perfect. Let’s now look at an even better design.
More Elegant Design
In the more elegant design we’re accounting for the fact that we could have so many subcategories that to tooltip could possible take over the report. Essentially we’re using the same strategies as before but we’ve incorporated a few new tricks.
Subcategories and More =
VAR SubcategoriesCount = DISTINCTCOUNT(‘Stock'[Subcategory])
RETURN
IF(SubcategoriesCount >= 3,
CALCULATE(CONCATENATEX(TOPN(3,VALUES(‘Stock'[Subcategory])),’Stock'[Subcategory],“, “))&” and more…”,
CALCULATE(CONCATENATEX(VALUES(‘Stock'[Subcategory]),’Stock'[Subcategory],“, “))
)
Let’s review this design:
- This time a variables is used. This is done to make things a little easier to follow but not a mandatory part of the design.
- Next, we utilize an IF statement with the intent to check the number of distinct subcategories that are found. The IF statement returns back TRUE or FALSE to the questions “Are there greater than or equal to 3 subcategories?”
- If the answer to that question is TRUE then we send it through a process that only returns the top 3 subcategories. It would also return back the text “ and more…” after the top 3 values.
- If the answer to the IF statement is FALSE then it would perform the CONTATENATEX function just like we saw in our simple design shown earlier.
Both of these designs solve this problem effectively but let’s now see what the final solution looks like.
Solution
Now for the final step is to pull the entire solution together. This step is simple because the only thing require is to add either of the two new fields discussed above to the tooltip area of the chart.

In this example I’ve added the Subcategories and More field, which checks how many distinct subcategories there are and if there are more than 3 cuts off the list there.
Summary
Leveraging tooltips in Power BI helps give you the ability to display additional information about the data your users are looking at. Leveraging DAX can take this to the next level. In this scenario we showed how DAX helped display multiple items in a comma separated list rather than just showing the first or last value of that list.
Resources
Video of solution:
- Dataset – Inventory Stock.xlsx
- Completed Example – 01 – Concatenated Tooltip.pbix

Hi Devin, this is is a fantastic pattern! I’ve added a small tweak:
Updated ToolTip =
VAR SubcategoriesCount =
DISTINCTCOUNT ( ‘Stock'[Subcategory] )
VAR NumberToShow = 3
VAR NumberRemaining = SubcategoriesCount – NumberToShow
RETURN
IF (
SubcategoriesCount >= NumberToShow,
CALCULATE (
CONCATENATEX (
TOPN ( NumberToShow, VALUES ( ‘Stock'[Subcategory] ) ),
‘Stock'[Subcategory],
“, ”
)
)
& ” and ”
& NumberRemaining
& ” more…”,
CALCULATE (
CONCATENATEX ( VALUES ( ‘Stock'[Subcategory] ), ‘Stock'[Subcategory], “, ” )
)
)
Two new variables. NumberToShow sets how many values to show (it’s used in the TOPN() function. NumberRemaining is used to dynamically display how many additional values there are.
There’s one other tweak, but it requires a separate ToolTip for each measure that you want to use this on.
Updated ToolTip =
VAR SubcategoriesCount =
DISTINCTCOUNT ( ‘Stock'[Subcategory] )
VAR NumberToShow = 3
VAR NumberRemaining = SubcategoriesCount – NumberToShow
RETURN
IF (
SubcategoriesCount > NumberToShow,
CALCULATE (
CONCATENATEX (
TOPN (
NumberToShow,
VALUES ( ‘Stock'[Subcategory] ),
[], DESC /*this can be ASC or DESC*/
),
‘Stock'[Subcategory],
“, ”
)
)
& ” and ”
& NumberRemaining
& ” more…”,
CALCULATE (
CONCATENATEX ( VALUES ( ‘Stock'[Subcategory] ), ‘Stock'[Subcategory], “, ” )
)
)
This time we add the 2 optional parameters to the TOPN() function. We first tell it what measure to rank on, and the order in which to rank.
Let’s say we use the measure [Sales], and order DESC in the TOPN() function. When the user hovers over the category, he or she will see the subcategories with the 3 highest Sales, and “X more”.
But, if you want to use this similar pattern for a # of products, you’ll need a new tooltip measure that uses [# of Products] in the TOPN() function. So it will take a little more development time, but your end users will have a great experience.
Also note that TOPN() does sort the values. I haven’t figured out a clean and efficient way to sort them.
Thanks again for posting an awesome pattern!
Nice improvement here!